Power Query- How to merge multiple workbooks with different file format
Hi All,
Hope you all are doing great!
As an Excel user, we maintain data in different files with different formats and at the end, we want to consolidate these files into excel.
First, we need to understand the problem then we will discuss its solution in detail.
Problems-
Lets suppose if we have a different file format data files e.g. Excel (Xlsx), Notepad (. Txt) and Ms-Access (.accdb) and we want to compile these files in Excel, normally we copy and paste data in to excel file however due to different file format excel cannot understand the format as well as their styles, so after posting data in to excel, we arrange all the alignments, apply font, convert in to borders etc. etc. So basically, it is a time-consuming process.
So, do we have any solution? Can this time-consuming process be reduced?
Say “Yes”
Solution-
This blog post will make us understand, not only how to upload all the files format but also How to create a link between desired folder and Excel master file. We can make this process very easy.
We will understand the whole process step by step and you can download the practice data file by clicking on this link –
Step1: – In our earlier blog post, we have already understood the process of “How to merge multiple worksheets data into one”, If you still have not read that you can click on this link merge-multiple-worksheets-data-excel-power-query. As I said above, we have a different file’s format with name Data-1, Data-2, Data-3 into one folder. You can see the reference image below-

We want to consolidate these files into one excel workbook.
How do we do that?
Step:2- Get the data in Power Query-
we will perform this process through “Merge Query” which is available in the Excel Add-ins “Power Query”.
Power Query- Power Query is an Excel add-in that can be used for data discovery, reshaping the data and combining data coming from different sources. Power Query is one of the Excel add-ins provided as part of Microsoft Power BI self-service solution.
Merge Query- we can merge more than one data files into one in a systematic manner.
Note: This option(Power Query) can be used by only Ms-office 2013 or upper version user like Ms-Office 2016 or Office 365.
The user of Ms-office 2013 can download power query by clicking on this link-Microsoft power query

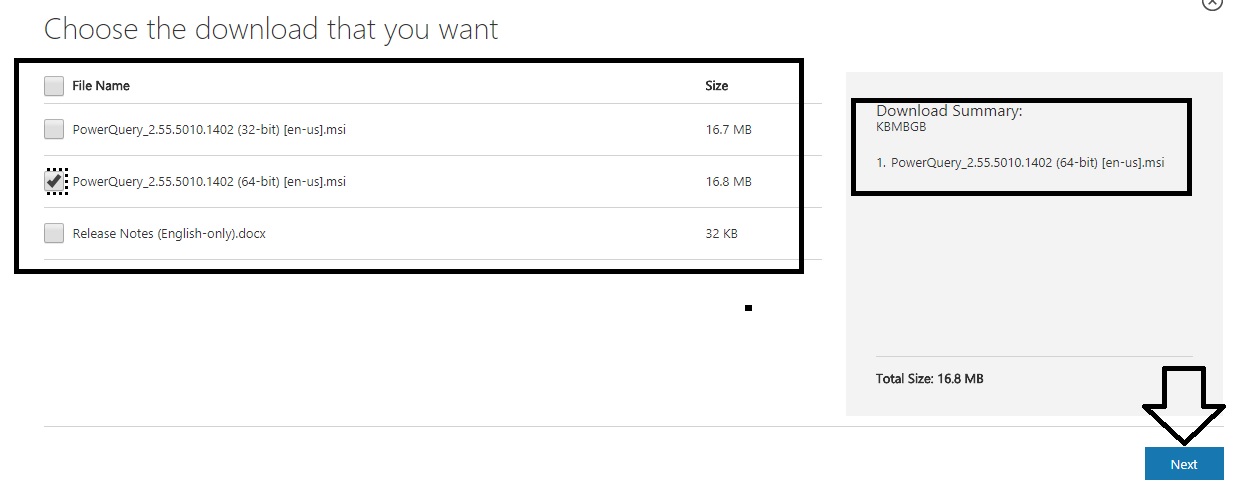
Select your system type -> right side download summary -> click on Next and your file downloading will start.
Where can you find Power Query? –
Ms-Office 2013- There will be an additional tab added to ribbon tab beside view tab.
Ms-office 2016 or 365- No need to download power query for this user as it is already inbuilt.
You can get it into Data tab.
Problem- If power query does not appear in Excel ribbon tab-
File-> Option-> Add ins-> Excel COM add ins-> Go-> click on Power query -> OK
Get data-
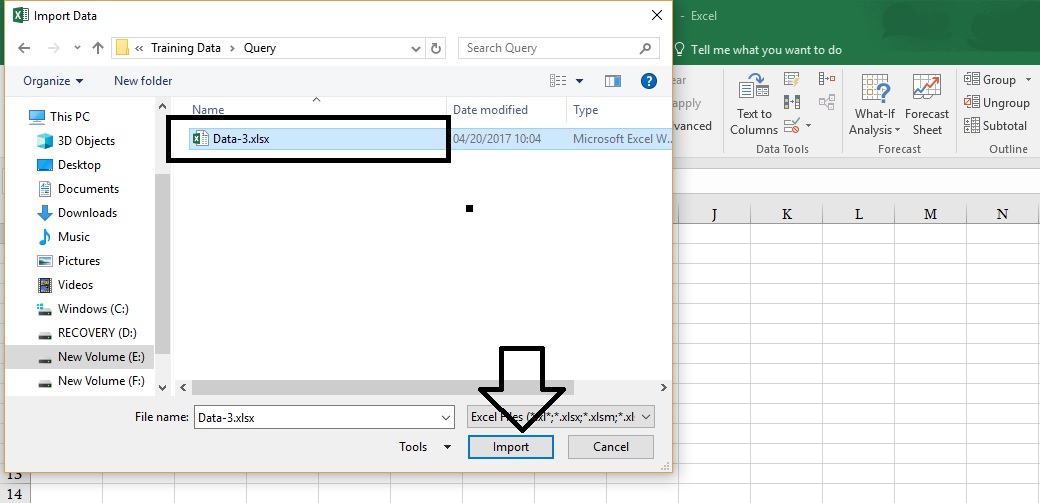
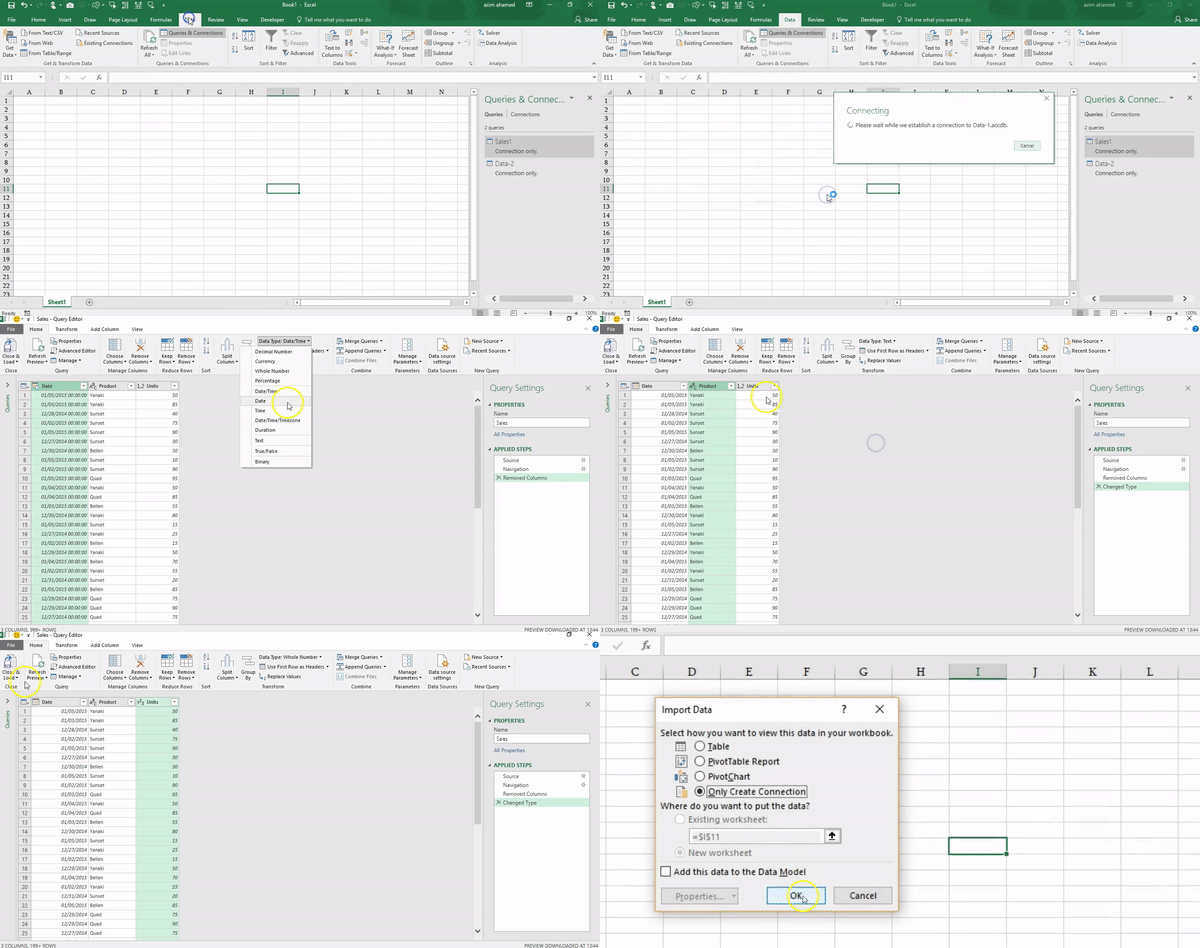
Open blank excel workbook-> Data tab->Get data->From File-> From Workbook-> Browse your file -> Select it -> Ok

Select File->Import
In Navigator-> select your table name->Click on Edit
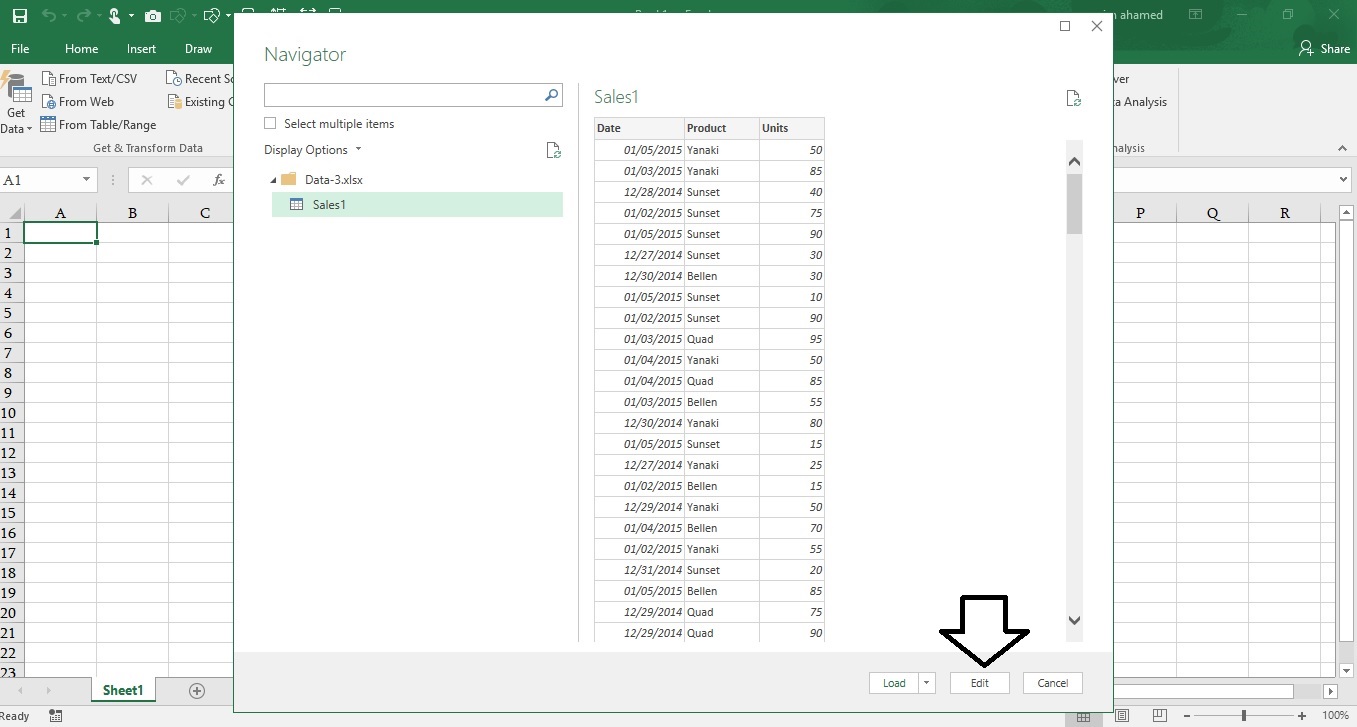
When you click on Edit, Data will open in “Power Query” window-> Here you can format your data-
E.g. Apply Date format-> select date column-> Home tab-> Data type-> Date
Apply Text format-> Select Product-> Home tab-> Data Type-> Text
Apply Decimal number-> Select Units-> Home tab-> Data Type-> Decimal Number
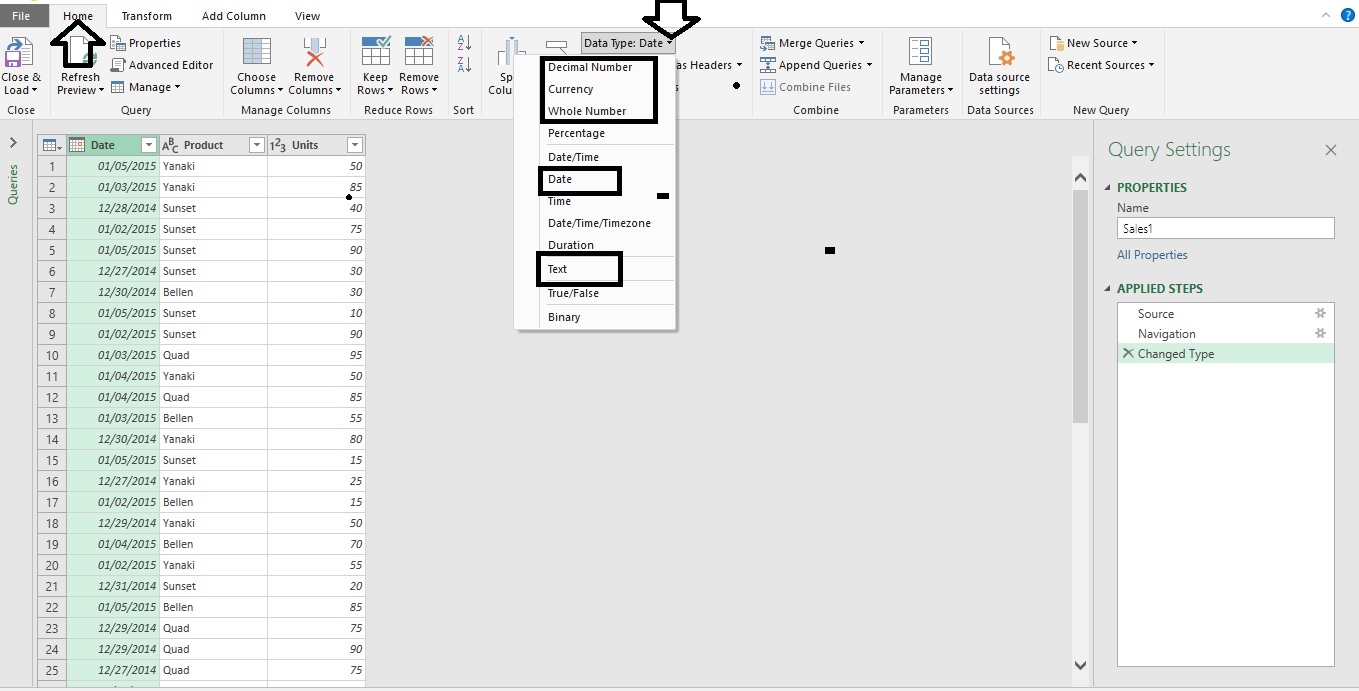
When formatting is done, “Click on Close & Load to “option
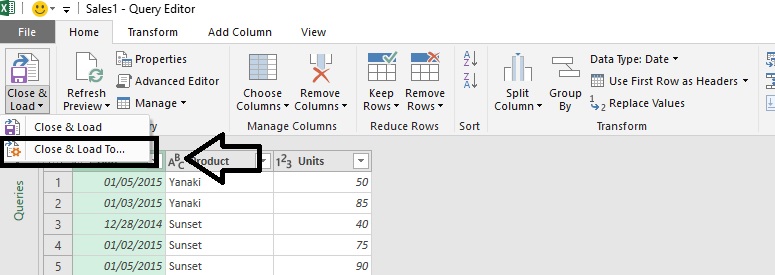
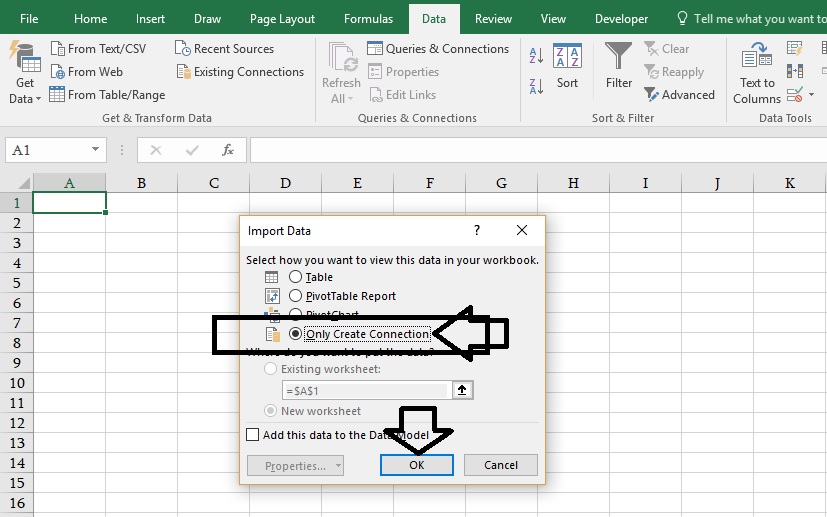
In this window, you must select “Only create connection” option.
“Only create connection”- On this stage, we want to make a connection between sheet.
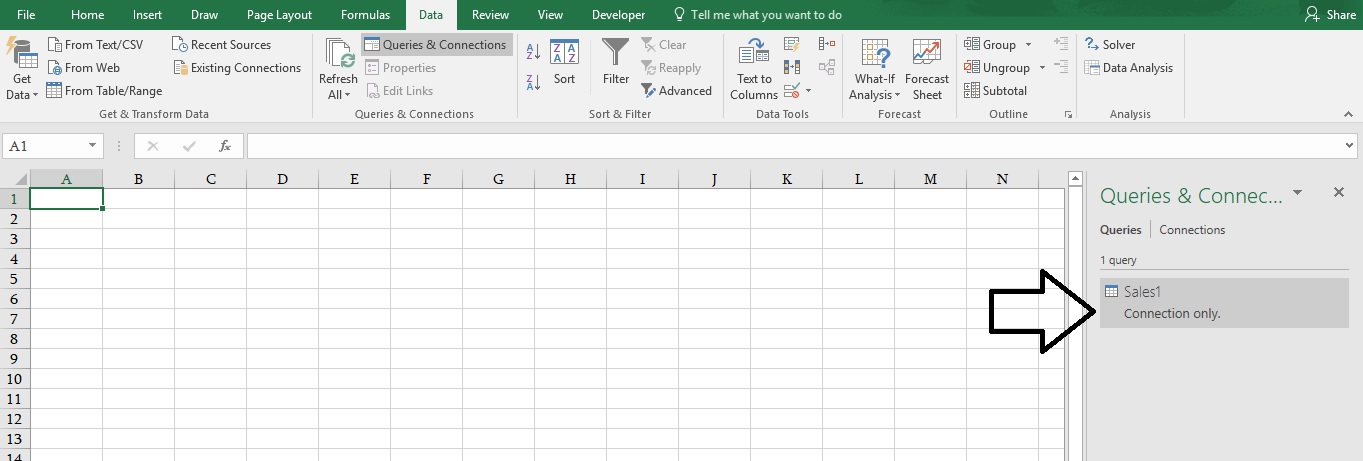
Connection properties will show the right side of the window in Queries & Connection.
Get Notepad file-> You can follow the step2 process.
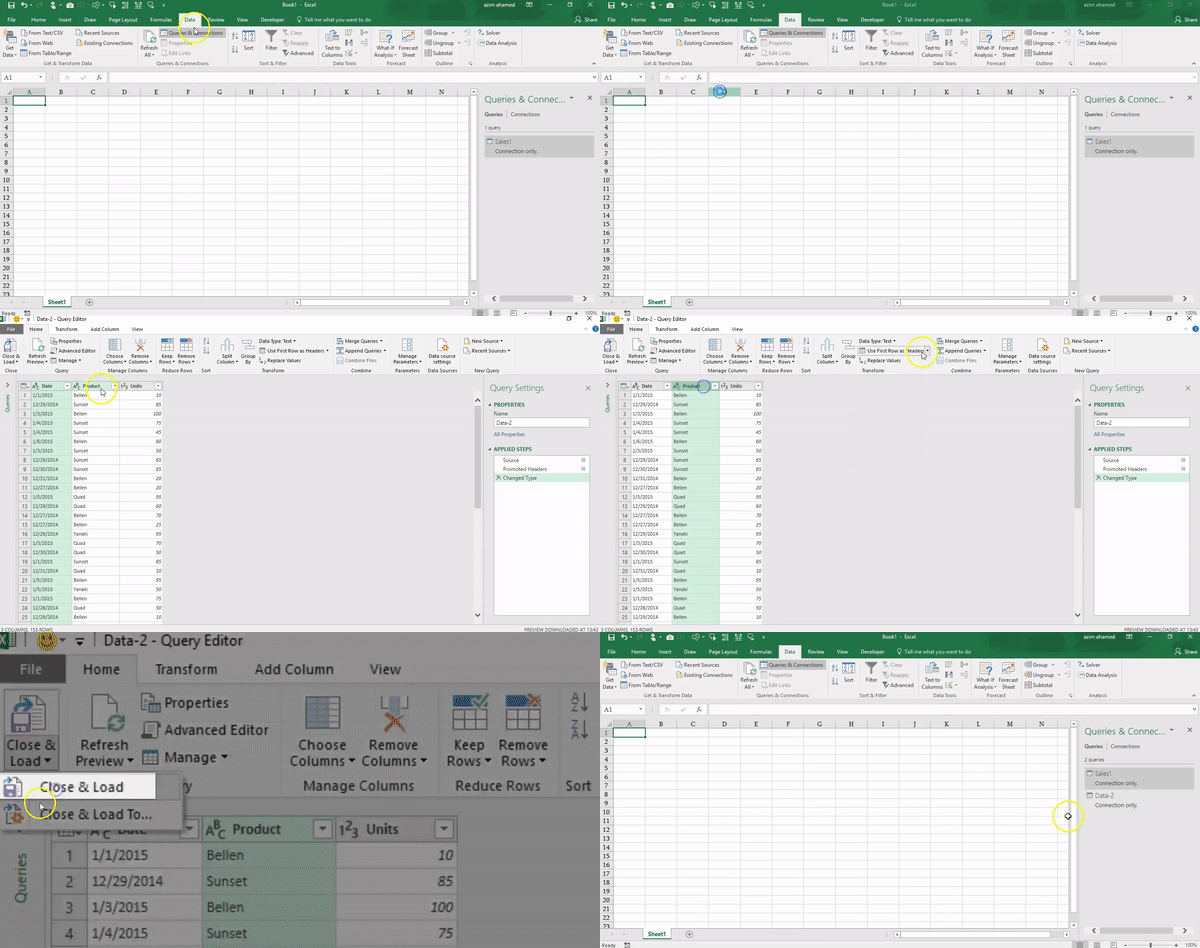
Get Ms-Access File-> You can follow step:2 process
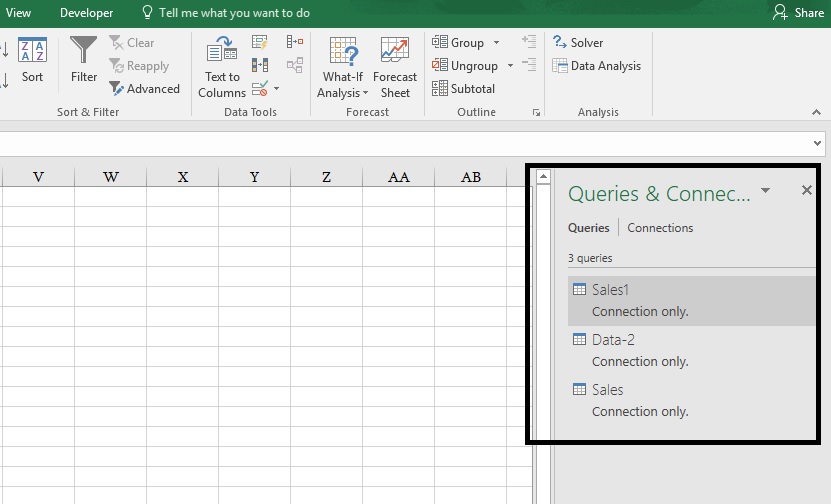
So, all the data has been uploaded successfully.
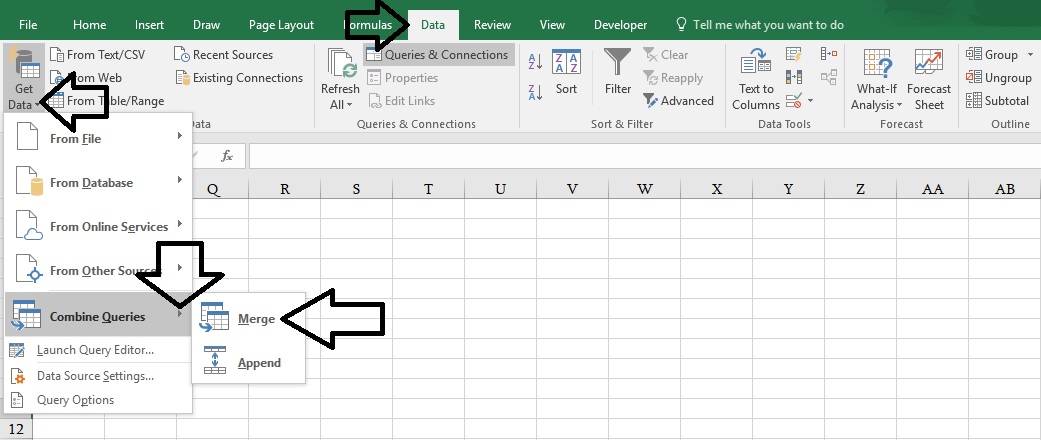
Step3:- Apply Merge Query-
Go to data tab-> Get Data-> Combine queries
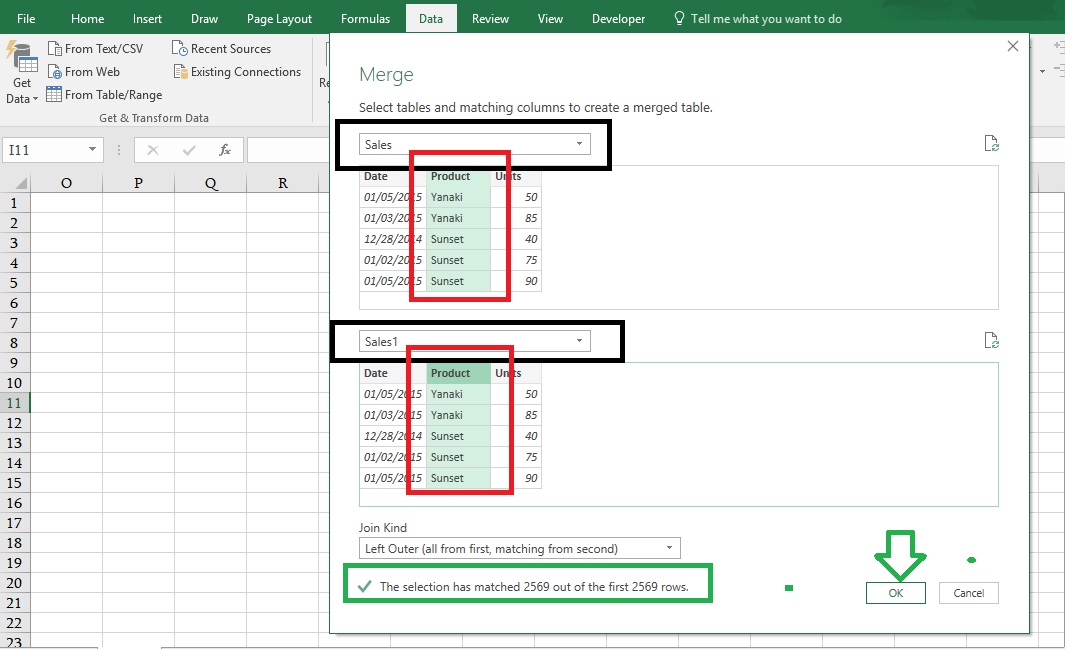
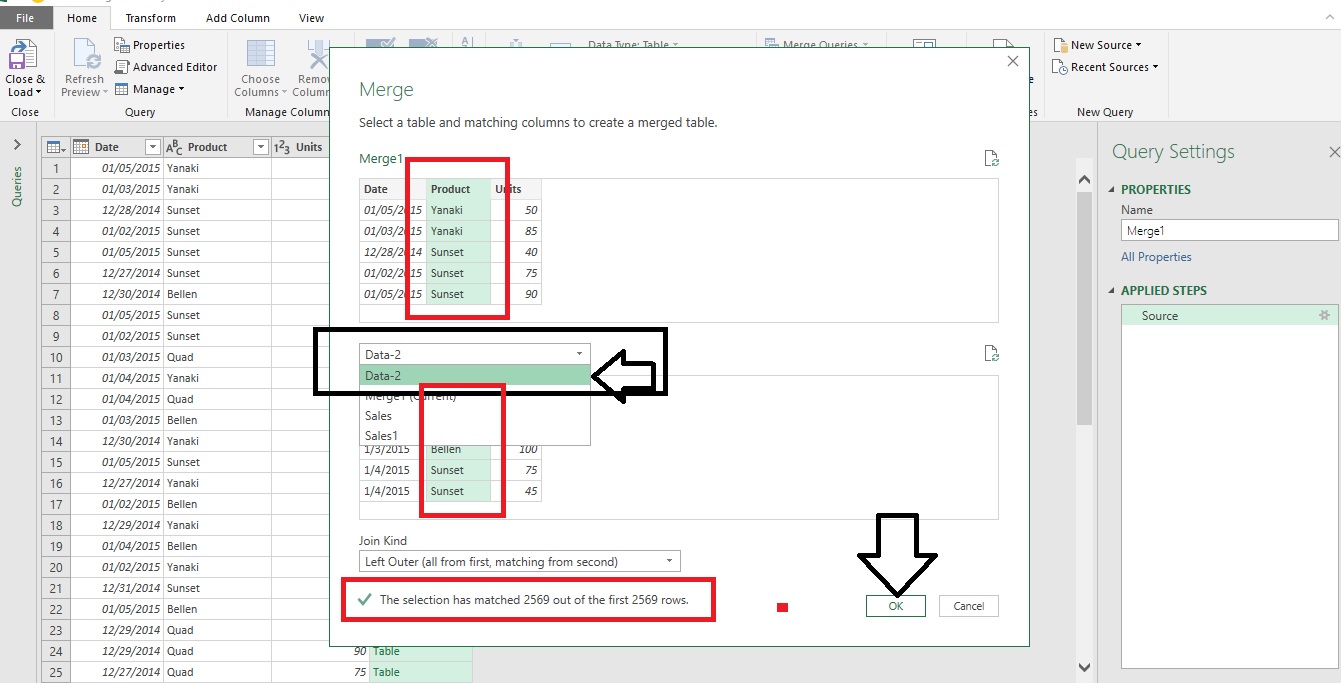
After clicking we will get a Merge window in which from the drop down (Highlighted in black color) select first two table e.g. Sales & Sales1.
After selecting table matched any two headings in both tables (Highlighted in Red color), Once this process has been accomplished you will get a message below the screen (Highlighted in Green color) then Ok.
Step4:- Add More query-
As we have added two tables only, however, we have another one, to add that go to Home tab-> Merge queries ->

Click on the drop-down list and select another heading (Highlighted in Black Colour) and same matched two headings (Highlighted in Rec color)-> Ok.
Step5: Extract merged data from the table-
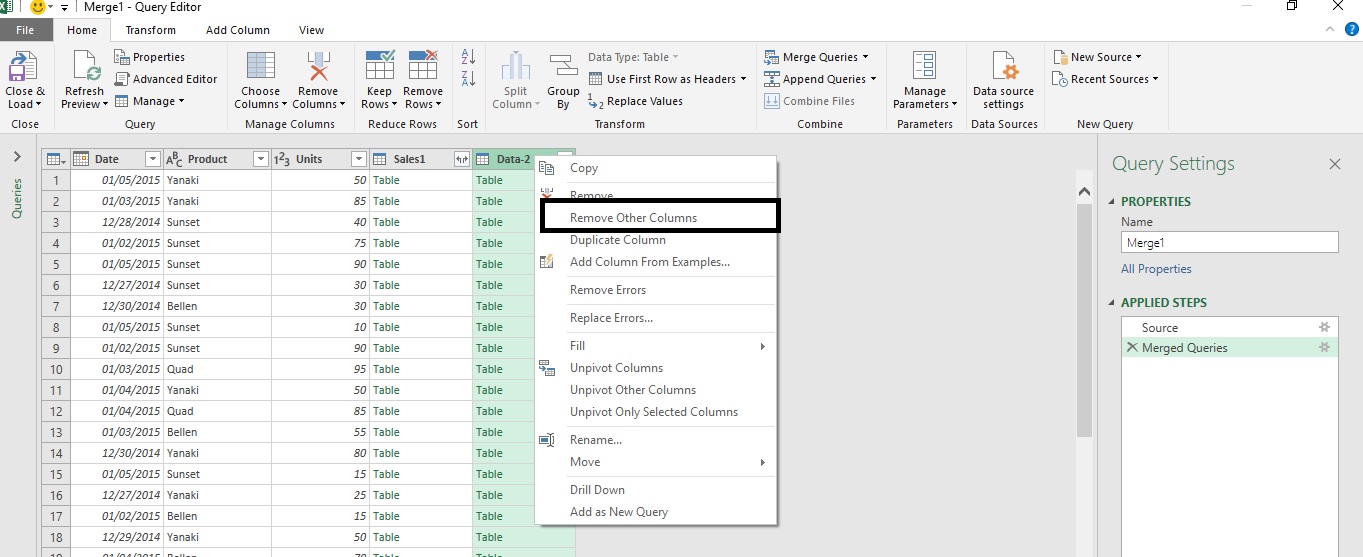
Right click on your table data-> Remove other columns
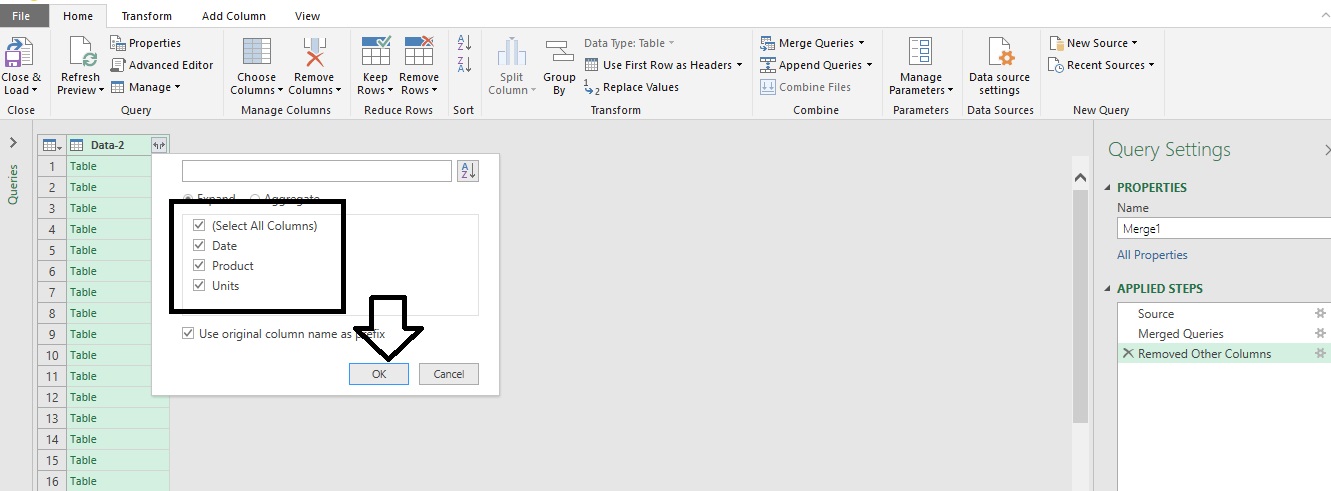
Expand the Table data by clicking on right side of Heading -> Ok
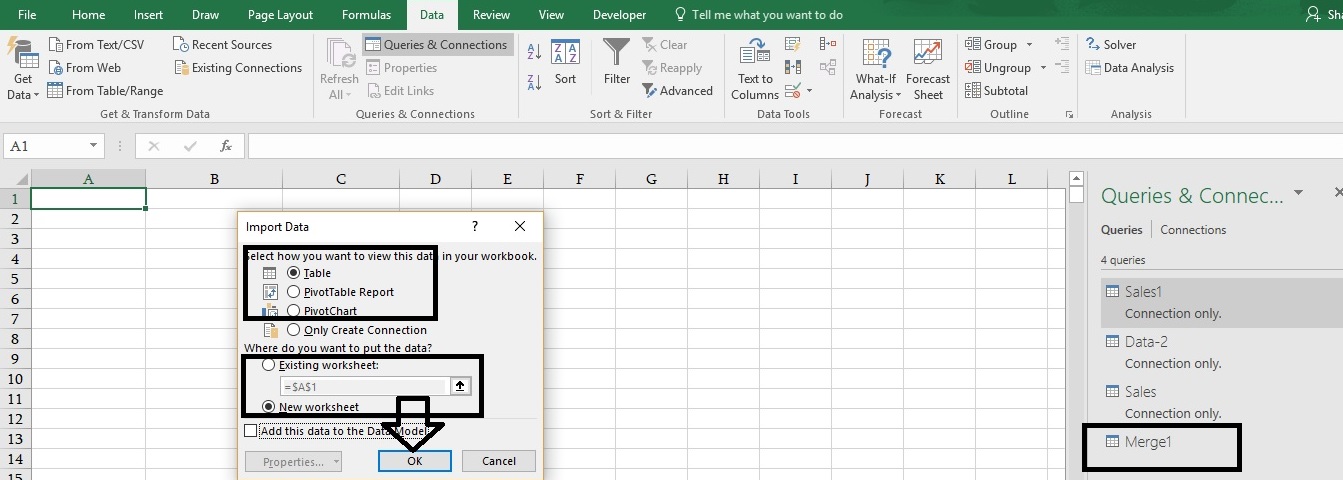
Home tab-> Close & Load to

Select any one of the formats-
1- Table- If you want to merge data in to table format
2- Pivot table- Directly convert data in Pivot table and create a report
3- Pivot chart- you can directly convert data into a chart
4- Existing worksheet- Not only you can upload merge data on your current worksheet or any other existing worksheet.
5- New worksheet- We can upload merge data in a new worksheet.
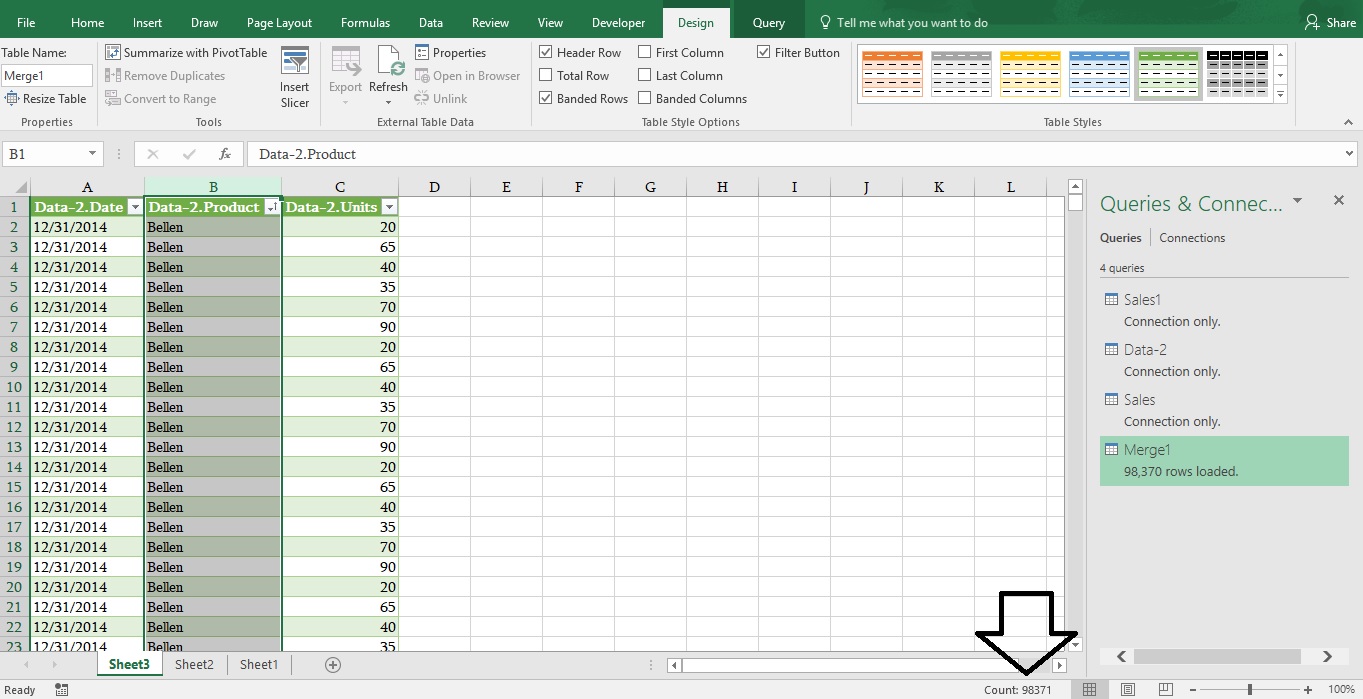
Holy! “98371” data has been uploaded instantly with the same format.
Happy Learning 😊
573 total views, 3 views today
Tag:corporate training companies, corporate training companies in Delhi, corporate training courses, corporate training in delhi, corporate training programs, excel course online, excel courses online, excel online course, excel online training, excel training in delhi, excel training online, learn microsoft excel, learn ms excel online, learning excel online, learning microsoft excel, microsoft excel course, microsoft excel online training, microsoft excel training, ms excel learning, MS excel online training, ms excel training in delhi, online corporate training, online excel course, online excel training, online excel training courses

